subota, 28. veljače 2015.

Miss Havisham; Final Makeup Design Research + Face Charts

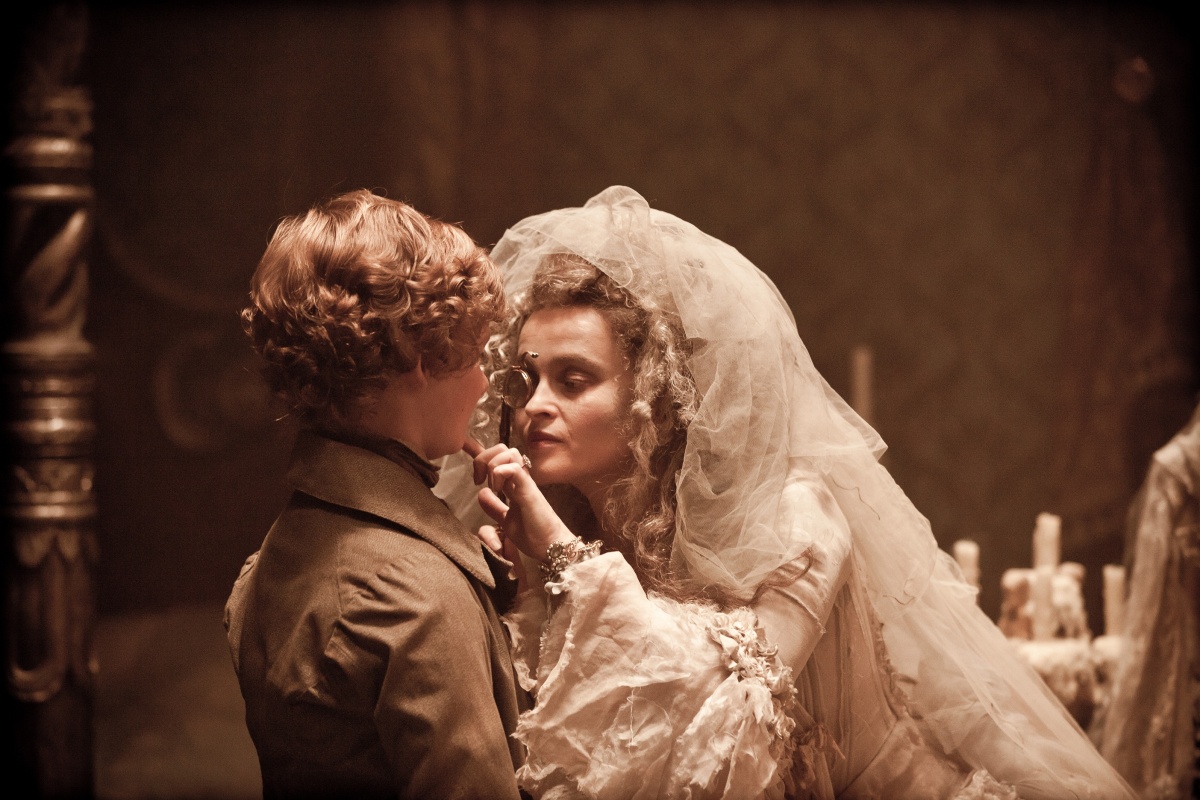
Because the Miss Havisham character that I'm creating is in her 30s, I did a research to find images of women of the same age. I found out that the easiest way to find those kind of images was to search up 'celebrities without makeup'. Of course wrinkles and looks don't really depend on the age, expecially when it comes to celebrities as many had plastic surgeries, botox etc., some live a very heathly lifestyle, and some smoke and drink, which is very bad for your skin. However, I just wanted to get a general idea of how old/wrinkled my character would have looked like, because I want the make up to look as realistic as possible. 

Mila Kunis
age: 30
London
March 13th 2013
Paparazzi shot
(source: http://www.mirror.co.uk/3am/celebrity-news/mila-kunis-without-make-up-looks-1760403)
Cameron Diaz Without Makeup Photos Free Download Images 02
Cameron Diaz
Selfie
age: 39
2012
(source: http://hdiwallpapers.com/celebrities-female/cameron-diaz-without-makeup-photos-free-download-images/1537)
katie-holmes-wrinkles
Katie Holmes
Age: 33
Paparazzi shot
(source: http://hotonline.net/?attachment_id=9498)
Katie-Holmes-no-makeup
Katie Holmes
Age: 36
Paparazzi shot
(source: http://www.huffingtonpost.com/2012/04/27/katie-holmes-gray-hair_n_1459412.html)

Jennifer Love Hewitt
Age: 35
2014
Paparazzi shot
(source: http://www.thesuperficial.com/photos/jenniferlovehewittinsweatpantswithoutmakeup/jenniferlovehewittinsweatpantswithoutmakeup4)
Gwyneth Paltrow
Gwyneth Paltrow
Age: 40
Paparazzi shot
(source: http://styledoor.com/entertainment/top-10-hollywood-actresses-without-makeup/)


Face Charts;

Look no.1

Products used: 

Face: White pepper + Caraway by Kryolan
Cheeks: Chive Blossom
Eyebrows: Caraway
Eyes: Caraway + Fennel + Sage Blossom by Kryolan 
Lips: LC142 + Caraway + Fennel 

Feb 12th 2015 

  Look no.2

Products used: 

Face: White Pepper
Eyebrows: Caraway
Eyes: Caraway + White Pepper+ Black Pepper + Shallot
Lips: Chive Blossom + Caraway
Feb 12th 2015

  Look no.3

Products used: 

Face: White pepper + Caraway by Kryolan
Cheeks: Blush Muave by Kryolan 
Eyebrows: Caraway
Eyes: Caraway + White Pepper+ Shallot  
Lips: LC002 + Caraway 

 Feb 12th 2015

 Look no.4

Products used: 

Face: White Pepper + Caraway by Kryolan
Cheeks: TO by Kryolan 
Eyebrows: Caraway
Eyes: Caraway + White Pepper+ Sage Blossom by Kryolan 
Lips: LC002 + Caraway + Fennel

Feb 12th 2015

  Look no.5

Products used: 

Face  Wrinkles: White pepper + Anis + Fennel
Eyebrows: Caraway
Eyes: Black Pepper + Anis + Shallot + Lavander by Kryolan 
Lips: White Pepper + Fennel

Feb 12th 2015

 Look no.6

Wrinkles: White Pepper + Caraway
Eyebrows: Caraway
Cheeks: Lover by Illamasqua
Eyes: Caraway + White Pepper by Kryolan + Lilac + Deep Purple by Avon, Purple Haze Palette
Lips: Youth Red + MAC Lip Mix Shine; 071, 081, 079 + 509 Supracolor by Kryolan

Feb 12th 2015

Look no.6

Products used: 

Face + Wrinkles: White pepper + Caraway by Kryolan
Cheeks: Blush Muave by Kryolan 
Eyebrows: Caraway
Eyes: Caraway + White Pepper+ Lilac + Deep Purple by Avon, Purple Haze Palette
Lips: Aquacolor 079 + Caraway 

Feb 12th 2015

 Look no.6

Products used: 

Wrinkles: White Pepper 
Eyebrows: Caraway
Cheeks: Lover by Illamasqua
Eyes: Heliopolis by Illamasqua + White Pepper by Kryolan + Lilac by Avon, Purple Haze Palette
Lips: Youth Red + MAC Lip Mix Shine

Feb 12th 2015

Miss Havisham; Final Makeup Design Practice

These are the continuity photos I took while creating of my final make up design on my partner...

Step 1

First I primed her face with the Illamasqua Matte Primer. She has very light skin complection which works very well with my design, so I applyed the foundation that matches her skin, then powdered. 

Foundation: Alabaster by Kryolan + Illamasqua White Base
Powder: Illamasqua Transluscent Powder

After applying the base

Step 2

Next I used my angled brush and shaped her eyebrows.

Eyebrows: Caraway + Black Pepper by Kryolan

 shaped eyebrows

Step 3

Using the Supracolor palette I mixed colours to get a shade of brown and with my angled brush I drew wrinkles around her eyes, nose, lips  and on her forehead. For me it is important that I photograph the wrinkles on her forehead because her natural lines are barely visible.  So I need to exactily know where to draw them when I recreate the look again.

WrinklesYellow (509), Red (079) + Blue (BL. 10)

Wrinkles
Front
 Wrinkles
Side

Step 4

Using my blending brush I blended the lines, starting from her forehead towards the chin. I decided to do the eyes last, as I will spend more time on them and add some more colour.

Blending
front
Blending 
side
All lines blended
front
 Step 5

I wanted to add more depth to the eyes so I mixed a little bit of black with the brown I already had. Also, I used purple around the inner corners and along the lower lash line, to make the under eye circles more realistic. 

Eyes: Brown (079, 509 + Bl. 10), Black 071 + Purple/Lila 


Colours only added underneath the eyes
Eyes final look

Step 6

First I tried to use the DUO to make her lips really chapped, but I didn't like how it looked, and it kept coming off. I ended up going over the lips with the foundation that I used before and then I added some gray eyeshadow to add depth. Then I powdered again.

Lips: Alabaster by Kryolan, Illamasqua White Base + Caraway by Kryolan
Powder: Illamasqua Transluscent Powder

We added the veil that we made for our assessments, go get the Miss Havisham feel to the look.

Final look 
side
(look created on Feb 17th 2015)

I am quite happy with the way this turned out but looking at the images I can see that the brown shade I used was too red. Also, the lines are not as blended as they should look as natural as possible, expecially the ones around the lips. 

Miss Havisham; Developing Final Hair Design

I had a few ides regarding my hair design for Miss Havisham, but wasn't sure which hairstyle to create. l really liked the Victorian hairstyles from the 1840s to early 1860s because of the lovely curls. I wanted to use them at the front and then make a bun at the back and pin the curls around it.

Of course, the hairstyle I choose to create in my final assessment will not be as neat as it should be as I am creating a Miss Havisham look when Pip first saw her. Her hair was everything but nice and neat. Having that in mind, here are some of the images that inspired me to create the hairstyle and drawings below...

Portrait of two sisters
1840
(source: http://gogm.livejournal.com/8269.html)
File:BarringerEW-MadrazoPC20080120-8829A.jpg
Elizabeth Wethered Barringer
oil on canvas
1852
artist: Frederico de Madrazo
(source: http://commons.wikimedia.org/wiki/File:BarringerEW-MadrazoPC20080120-8829A.jpg)
late 1850s evening hairstyle 
drawing
(source: https://www.pinterest.com/pin/179088522657540525/)
Gillian Anderson as Miss Havisham
Great Expectations 
2011
(source: https://gillianderson.wordpress.com/2012/09/16/great-expectations-2011/)
Gillian Anderson as Miss Havisham
Great Expectations 
2011
(source: https://gillianderson.wordpress.com/2012/09/16/great-expectations-2011/)

Practicing in the lesson

In our lesson with Helen, I asked her to help me how to create the look I want to create. She said that the best thing I should do is to make a twisted bun and then pin the curls around it. Originally, I was going to curl my partners fringe but Helen advised me to have them straight for my Miss Havisham look, and curl them when I do Estella's hairstyle in a few weeks. Also, I took a lot of continuity photos as I was going along.

So first I created a middle parting and left the fringe straight. Then I sectioned the top part of the hair at the back into a pony tail. I didn't do it very neatly because of the messy the look I was going for. Simply twisting the hair around I create some kind of a bun, in this case padding, and pinned it to stay in place. Then I curled the rest of the hair, using the bigger tongs,  making sure I had three even sections at the front, and pinned the curls until they cool down. Finally, I pinned the curls around the bun, where I thaught they would look nice, leaving the three sections down to frame the face. I made sure I had bits of hair falling down to get that messy look.

My partiners hair before styling
Sectioning the hair
Twisted bun - padding
Twisted bun up close
Pinned curls
Hair after taking out the pins
Hair after curling - front and back sections
Pinning the curls around the bun
 Pinning the curls around the bun
Final look -back
Final look - side
Final look - front
(hairstyle created on Feb 17th 2015)

The hairstyle is not hard to create but considering we only get an hour and a half to create both hair and make up, I don't want to spend a lot of time curling (it took me 45 minutes to curl in the lesson. Therefore, I have decided to create a look similar to this one, but with slight changes so I aviod the stress of not having enough time in my timed assessment. Also, I will use gel or a similar product to make the hair look greasy because, let's face it,  hair gets greasy after not washing it for 3 or 4 days, so I can only imagine what Miss Havisham's looked and felt. 

Thes is just a drawing that I created by taking inspiration from hairstyle I've created and the images above...

One my ideas for a mid Victorian hairstyle
drawing
(Feb 18th 2015)


reference found on: Feb 15th 2015

Miss Havisham; Wedding Dress + Veil

Without a wedding dress and a veil, our character would look like any other old lady. So me and my partner, Rachel, decided to make both, following Pip's description of her; 

"And she had a long white veil dependent from her hair, and she had bridal flowers in her hair, but her hair was white." 

"But, I was that everything within my view which ought to be white, had been white long ago, and had lost its lusre, and was faded and yellow. I saw that the bride within the bridal dress had withered like the dress, and like the flowers, and had no brightness left but the brightness in her eyes." (Dickens, C. (1986) Great Expectations  (pages 54/55- chapter 8),  Marshall Cavendish Partworks Ltd, 58 Old Compton Street, London  WIV 5PA)

We got 2m of yellowish lace, little fake flowers and a headband to hold the veil with. First we cut the lace almost in half, so the piece that will be used for the dress is a few inches bigger. 

Veil

Queen Victoria chose Honiton lace for her veil and dress; supporing the British lace industry. Her veil was long with a wreath of flowers at the top of her head.

Queen Victoria
Portrait of Queen Victoria wearing her wedding veil
anniversary present for Prince Albert
oil on canvas
1847
Artist: Franz X. Winterhalter
(source: http://en.wikipedia.org/wiki/Wedding_dress_of_Queen_Victoria)
Miss Havisham and Pip
Great Expectations
2012
(source: http://www.fanpop.com/clubs/great-expectations-2012/images/32915601/title/miss-havisham-photo)

We took the smaller piece of fabric, cut it in half, so it looks bigger and thicker. Then sewed it around the headband. Then, we stuck the flowers in the fabric around the headband to decorate it. It wasn't perfect, but neither was Miss Havisham's. 

lace, flowers, headband
Sewing the lace around the headband
Decorating 
Final look
Finall look

Wedding dress

We are both built very differently, so we wanted to make a 'dress' that we could both wear and adjust it. As we have already researched Victorian wedding dresses, we noticed that they all had off shoulder sleeves, and we wanted to create something similar. 

Queen Victoria in her wedding dress 
(1842)
Oil on canvas
Artist: Franz Xaver Winterhalter
(source: http://thedreamstress.com/2011/04/queen-victorias-wedding-dress-the-one-that-started-it-all/)

We decided to tuck in and wrap the lace around a creme silk top which she already had. Trying different styles to see what looks best and decided to take the lace over the shoulders and pinning it at the back. To keep it in place at the front we tied a creme headband at the and decorated it with some fake flowers. 

Silk top and lace
creating a look
Final look
(dress + veil created on Feb 16th 2015)

Neither one of us is very good at sewing, but we had fun and I think this will work well in our assessment. At the end we added a bouquet of white fake flowers which she dipped in coffee to make them look old and dead. 

Fake flowers dipped in coffee


http://www.confetti.co.uk/inspiration/bridal-veils-through-the-decades/
reference found on Feb 16th 2015